

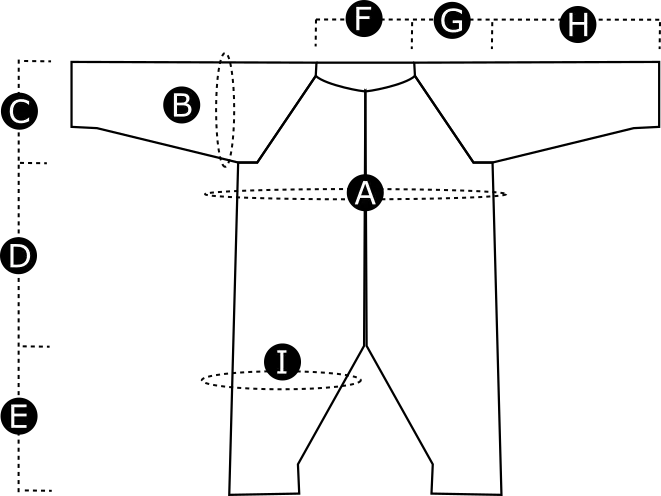
| Sizes | 3 months | 6 months | 12 months | 18 months | 24 months |
| A (Bust) | 18″ 45cm | 20″ 51cm | 21″ 53cm | 22″ 56cm | 23″ 59cm |
| B (Upper arm) | 9″ 21cm | 9″ 23cm | 10″ 24cm | 10″ 25cm | 11″ 27cm |
| C & G (Yoke depth) | 3.25″ 8.5cm | 3.5″ 9cm | 3.75″ 9.5cm | 4″ 10cm | 4.25″ 10.5cm |
| D (Underarm to crotch) | 7.5″ 19cm | 9″ 23cm | 10″ 25.5cm | 11″ 28cm | 11.5″ 29cm |
| E (Crotch to cuff) | 7″ 18cm | 8.5″ 22cm | 9.5″ 24cm | 10″ 25.5cm | 11.5″ 29cm |
| F (Back neck width) | 4″ 9cm | 4″ 11cm | 5″ 12cm | 5″ 12cm | 5″ 12cm |
| H (Sleeve length from underarm to cuff) | 6″ 15.5cm | 6.5″ 16.5cm | 7.5″ 19cm | 8″ 20.5cm | 8.5″ 21.5cm |
| I (Upper leg) | 11″ 28cm | 12″ 31cm | 13″ 32cm | 13″ 33cm | 14″ 35cm |
Knitting abbreviations used in this pattern you can find here.
With bigger needles CO 42,44,50 (50,50) sts. Sample uses the long tail CO method.
Setup round: k1 (front), pm, p2 (raglan stitches), pm, k 10, 10, 12 (12, 12) (sleeve) sts, pm, p2 (raglan stitches), pm, k 12, 14, 16 (16, 16) (back), pm, p2 (raglan stitches), pm, k 10, 10, 12 (12, 12) (sleeve), pm, p2 (raglan stitches), pm, k1 (front)
| Sizes (months) | Front | Raglan | Sleeve | Raglan | Back | Raglan | Sleeve | Raglan | Front | Total |
| 3 | 1 | 2 | 10 | 2 | 12 | 2 | 10 | 2 | 1 | 42 |
| 6 | 1 | 2 | 10 | 2 | 14 | 2 | 10 | 2 | 1 | 44 |
| 12-24 | 1 | 2 | 12 | 2 | 16 | 2 | 12 | 2 | 1 | 50 |
Row 1 (RS): k to marker (front), m1l, sm, k2 (raglan stitches), sm, m1r, k to marker (sleeve), m1l, sm, k2 (raglan stitches), sm, m1r, k to marker (back), m1l, sm, k2 (raglan), sm, m1r, k to marker (sleeve), m1l, sm, k2 (raglan stitches), sm, m1r, k to end (front), CO 1 st (use the knitted CO method)
9 sts increased.
Row 2 (WS): k everything else but p all the raglan seam sts (slip all markers), CO 1 st
Repeat rows 1 & 2 two more times. A total of 72, 74, 80 (80, 80) sts.
| Sizes (months) | Front | Raglan | Sleeve | Raglan | Back | Raglan | Sleeve | Raglan | Front | Total |
| 3 | 7 | 2 | 16 | 2 | 18 | 2 | 16 | 2 | 7 | 72 |
| 6 | 7 | 2 | 16 | 2 | 20 | 2 | 16 | 2 | 7 | 74 |
| 12-24 | 7 | 2 | 18 | 2 | 22 | 2 | 18 | 2 | 7 | 80 |
Row 3 (RS): k to marker (front), m1l, sm, k2 (raglan stitches), sm, m1r, k to marker (sleeve), m1l, sm, k2 (raglan stitches), sm, m1r, k to marker (back), m1l, sm, k2 (raglan), sm, m1r, k to marker (sleeve), m1l, sm, k2 (raglan stitches), sm, m1r, k to end (front), CO 0, 1, 2 (2, 2) sts (use the knitted CO method)
Row 4 (WS): k everything else but p all the raglan seam sts (slip all markers), CO 0, 1, 2 (2, 2) sts
A total of 80, 84, 92 (92, 92) sts.
| Sizes (months) | Front | Raglan | Sleeve | Raglan | Back | Raglan | Sleeve | Raglan | Front | Total |
| 3 | 8 | 2 | 18 | 2 | 20 | 2 | 18 | 2 | 8 | 80 |
| 6 | 9 | 2 | 18 | 2 | 22 | 2 | 18 | 2 | 9 | 84 |
| 12-24 | 10 | 2 | 20 | 2 | 24 | 2 | 20 | 2 | 10 | 92 |
Row 5 (RS): k to marker (front), m1l, sm, k2 (raglan stitches), sm, m1r, k to marker (sleeve), m1l, sm, k2 (raglan stitches), sm, m1r, k to marker (back), m1l, sm, k2 (raglan), sm, m1r, k to marker (sleeve), m1l, sm, k2 (raglan stitches), sm, m1r, k to end (front)
8 sts increased.
Repeat increases every 4th row (every other RS row) 2, 3, 3 (4, 5) more times. A total of 104, 116, 124 (132, 140) sts.
Between the increases on WS rows k everything else but p all the raglan seam sts (slip all markers). On rs row k all (slip all markers).
| Sizes (months) | Front | Raglan | Sleeve | Raglan | Back | Raglan | Sleeve | Raglan | Front | Total |
| 3 | 11 | 2 | 24 | 2 | 26 | 2 | 24 | 2 | 11 | 104 |
| 6 | 13 | 2 | 26 | 2 | 30 | 2 | 26 | 2 | 13 | 116 |
| 12 | 14 | 2 | 28 | 2 | 32 | 2 | 28 | 2 | 14 | 124 |
| 18 | 15 | 2 | 30 | 2 | 34 | 2 | 30 | 2 | 15 | 132 |
| 24 | 16 | 2 | 32 | 2 | 36 | 2 | 32 | 2 | 16 | 140 |
Work in pattern (raglan sts stockinette otherwise garter) until your work measures approximately 3.25, 3.5, 3.75 (4, 4.25)” [8.5, 9, 9.5 (10, 10.5) cm] from mid back neck and you are at the beginning of a RS row.
CO the underarms sts using either the knitted CO method or the backwards loop CO method.
Row 7 (RS): k to first marker, remove the marker, k1 (front), place the next 26, 28, 30 (32, 34) sts on scrap yarn for the sleeve (remove the second and third marker), CO 6 sts (underarm), k1, remove the fourth marker, k to fifth marker, remove the marker, k1, place the next 26, 28, 30 (32, 34) sts on scrap yarn for the sleeve (remove the sixth and the seventh marker), CO 6 sts (under arm), k1, remove the eighth marker, k to end.
A total of 64, 72, 76 (80, 84) sts for the body.
Work in garter stitch (k all rows) until your work measures 7.5, 9, 10 (11, 11.5)” [19, 23, 25.5 (28, 29) cm] from underarm.
Next RS row: work in pattern to end and CO 2sts, pm (mid front, BOR), CO 2sts, join for knitting in the round.
A total of 68, 76, 80 (84, 88) sts for the body.
Now you begin working garter stitch in the round which means that you knit every other round and purl every other round.
P one round and k one round.
Setup round: from BOR p 34, 38, 40 (42, 44) sts, pm (mid back), p to BOR
Increase round: from BOR k2,k1fb, k to 3 sts before marker k1fb,k2, sm, k2, k1fb, k to 3 sts before BOR, k1fb, k to end
Repeat three more times every other round. A total of 84, 92, 96 (100, 104) sts.
From BOR work in garter stitch to the mid back marker. Place next 42, 46, 48 (50, 52) sts on scrap yarn for the right leg.
Pm, join for working in the round
Left leg: k one round, p one round
Decrease round: k1, ssk, work in garter stitch to 3 sts before the marker, k2tog, k1
Repeat five more times every 8, 10, 10 (12, 14) th round or if your row gauge differs every 0.9, 1.2, 1.2 (1.4, 1.6)” [2.5, 3, 3 (3.5, 4) cm].
A total of 30, 34, 36 (38, 40) sts.
Work in pattern until your leg measures 5.5, 7, 7.5 (8, 9.5)” [14, 18, 19 (20.5, 24) cm] from crotch.
Change to smaller needles and work 1.5, 1.5, 2 (2, 2)” [4, 4, 5 (5, 5) cm] of ribbing k1, p1.
Break the yarn, leaving a tail that is approximately 3 times the length of the edge. Bind-off using the tubular bind-off method.
Take the working yarn and leave a long enough tail that you can use to close the small hole that forms in the crotch at the same time you weave in ends.
P one round, join for knitting in the round, k one round, p one round and begin the gusset decreases. Rest of the leg is worked the same way as the leg left.
Place held stitches of sleeve on larger needles, pick up and knit 3 sts from underarm, pm, pick up and knit 3 sts from underarm.
A total of 32, 34, 36 (38, 40) sts for the sleeves. Begin working in the round.
Work 7, 9, 11 (11, 13) rounds in garter stitch.
Decrease round (knit round): k1, ssk, k to 3 sts from end, k2tog, k1.
Repeat decrease round three more times every 8, 10, 12 (12, 14) th round or if your row gauge differs every 0.9, 1.2, 1.4 (1.4, 1.6)” [2.5, 3, 3.5 (3.5, 4) cm]. A total of 24, 26, 28 (30, 32) sts.
Work in pattern until your sleeve measures 4.5, 5, 5.5 (6, 6.5)” [11.5, 12.5, 14 (15.5, 16.5) cm] from underarm.
Change to smaller needles and work 1.5, 1.5, 2 (2, 2)” [4, 4, 5 (5, 5) cm] of ribbing k1, p1.
Bind-off the same way as legs.
Read the whole section carefully before making the button band!
First, calculate how many rows you have between the neckline and crotch. And then make the following calculation:
(number of rows- 7) / 18
For instance, I have 104 rows on my sample (size: 12 months) so I get (104-7) / 18 =5.3888
Take the whole number part of the previous result. This is how many full repeats you have of the 18-row lace pattern. In my example, it is 5. Next, calculate how many extra rows in addition to the full repeats you need to achieve the total row count.
extra rows = number of rows -number of full repeats*18
In my case, it would be 104 – 5*18 = 14
After finishing the last lace repeat we want to work a few rows of garter stitch. So calculate how many extra rows of garter stitch you need to work before beginning the lace repeat with the following formula: extra rows -7 rows of garter stitch.
In my case, the number of extra rows would be 14 – 7 = 7 rows.
If you get a number that is smaller than 0 make the calculations again with one full repeat less (in my case it would be 4).
With smaller needles CO 8 sts.
Attach the sts to the bottom edge of the right front piece
Pickup and knit 1 st (pickup the thread between the garter bumps) at the bottom edge of the right front piece, turn your work, k the picked st, k the next st, pass the first st over the second st, k to end.
Work according to the extra row chart beginning from lower right corner. Attach the button band always at the end of RS row as you did previously until you have worked the number of extra rows you calculated before.
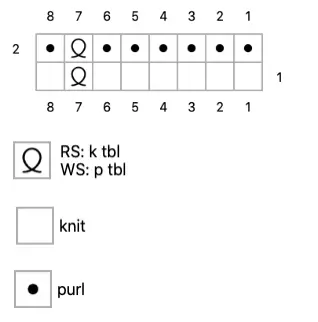
Row 1 (RS): K6, k tbl, k1. (8 sts)
Row 2 (WS): K1, p tbl, k6.
After finishing the extra rows: if you are now at the beginning of RS row work in pattern to end and pickup and knit 1 st and turn your work.
On the next row don’t slip the picked stitch over!
Next row (WS): k the picked st, k1, p tbl, k1, BO 4 sts (do not cut your yarn!), turn your work. You should have now 4 sts, a small bind-off edge and 1 st. A total of 5 sts.
Turn your work.
Work the button band
Work the first row according to Chart A (on page 13), pickup and knit 1 st, turn your work, k the picked st, work the next st according to row 2 of Chart A, pass the first st over, work according to the Chart A to end.
Work this way, always working the next row of Chart A until you have worked to the last lace repeat. Work the last repeat according to Chart B. After finishing the last lace repeat work rest of the rows in garter stitch and BO.
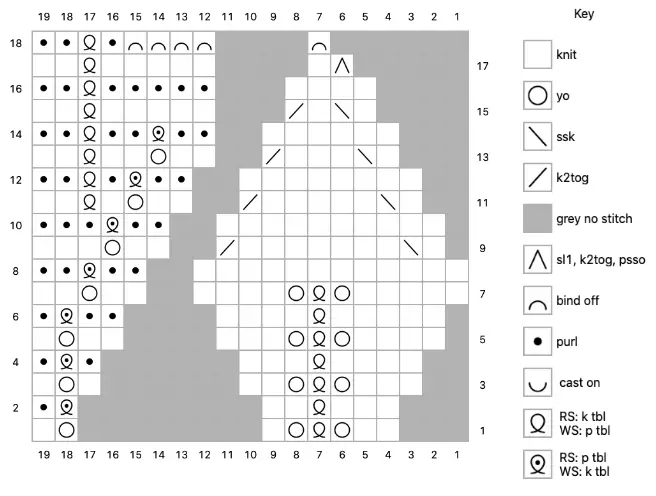
Row 1 (RS): K2, yo, k tbl, (yo, k1) × 2. (8 sts)
Row 2 (WS): K1, k tbl, p2, p tbl, p3.
Row 3: K3, yo, k tbl, yo, k3, yo, k1. (11 sts)
Row 4: K1, k tbl, k1, p3, p tbl, p4.
Row 5: K4, yo, k tbl, yo, k5, yo, k1. (14 sts)
Row 6: K1, k tbl, k2, p4, p tbl, p5.
Row 7: K5, yo, k tbl, yo, k6, yo, k2. (17 sts)
Row 8: K2, k tbl, k2, p12.
Row 9: K1, ssk, k7, k2tog, k2, yo, k3. (16 sts)
Row 10: K3, k tbl, k2, p10.
Row 11: K1, ssk, k5, k2tog, k2, yo, k1, k tbl, k2. (15 sts)
Row 12: K2, p tbl, k1, k tbl, k2, p8.
Row 13: K1, ssk, k3, k2tog, k2, yo, k2, k tbl, k2. (14 sts)
Row 14: K2, p tbl, k2, k tbl, k2, p6.
Row 15: K1, ssk, k1, k2tog, k5, k tbl, k2. (12 sts)
Row 16: K2, p tbl, k5, p4.
Row 17: Sl1, k2tog, psso, k6, k tbl, k2. (10 sts)
Row 18: K2, p tbl, k1, bind off × 5. (5 sts)
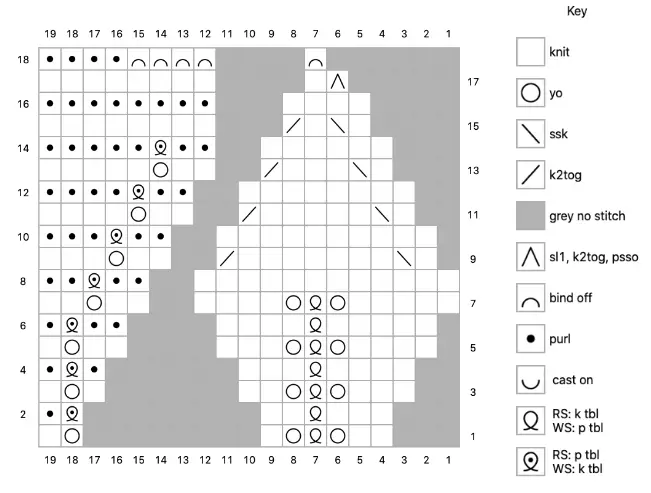
Row 1 (RS): K2, yo, k tbl, (yo, k1) × 2. (8 sts)
Row 2 (WS): K1, k tbl, p2, p tbl, p3.
Row 3: K3, yo, k tbl, yo, k3, yo, k1. (11 sts)
Row 4: K1, k tbl, k1, p3, p tbl, p4.
Row 5: K4, yo, k tbl, yo, k5, yo, k1. (14 sts)
Row 6: K1, k tbl, k2, p4, p tbl, p5.
Row 7: K5, yo, k tbl, yo, k6, yo, k2. (17 sts)
Row 8: K2, k tbl, k2, p12.
Row 9: K1, ssk, k7, k2tog, k2, yo, k3. (16 sts)
Row 10: K3, k tbl, k2, p10.
Row 11: K1, ssk, k5, k2tog, k2, yo, k4. (15 sts)
Row 12: K4, k tbl, k2, p8.
Row 13: K1, ssk, k3, k2tog, k2, yo, k5. (14 sts)
Row 14: K5, k tbl, k2, p6.
Row 15: K1, ssk, k1, k2tog, k8. (12 sts)
Row 16: K8, p4.
Row 17: Sl1, k2tog, psso, k9. (10 sts)
Row 18: K5, bind off × 5. (5 sts)
With bigger needles and RS facing you, beginning from the top edge of the left front piece, pick up and knit 1 st between every garter bump. Work 1″ [2.5 cm] in garter stitch. BO using the icelandic bind-off method.
With the RS facing you beginning from right front (on top of the button band) with smaller needles pickup and knit 53, 57, 65 (65, 65) sts for the neck ribbing
| Sizes (months) | Front | Raglan | Sleeve | Raglan | Back | Raglan | Sleeve | Raglan | Front | Total |
| 3 | 6 | 2 | 10 | 2 | 12 | 2 | 10 | 2 | 7 | 53 |
| 6 | 7 | 2 | 10 | 2 | 14 | 2 | 10 | 2 | 8 | 57 |
| 12-24 | 8 | 2 | 12 | 2 | 16 | 2 | 12 | 2 | 9 | 65 |
Row (WS): p1, k1
Work 5 more rows of ribbing and bind off the same way as cuffs.
Block the lace part of your button band by letting it first soak so that it’s thoroughly and evenly damp. Remove excess water and shape the button band. Use some pins to attach it to a blocking mat so that it holds its shape. Leave to dry thoroughly before removing the pins. Attach the bottoms of the button bands to mid front so that the lace band is on top. Sew together the opening between the legs. Weave in ends and sew the buttons on to the left band.


2 reviews for Ihana Baby Overall